Chapter 6: Interactive Screens, Hotspots & Nested Menus
Interactive Screens transform RagNext from a text adventure engine into a full visual GUI engine. With Interactive Screens, you can create point-and-click graphic interfaces, custom RPG battle HUDs, interactive backpacks, digital keypad locks, and shopkeeper trading screens.
In this chapter, you will learn how to enable interactive screens, position and style hotspot buttons, build self-contained inline action logic, and nest interactive screens on a navigation stack.
6.1 Understanding Interactive Screens
An Interactive Screen is a visual GUI overlay that displays above a Room or GameObject.
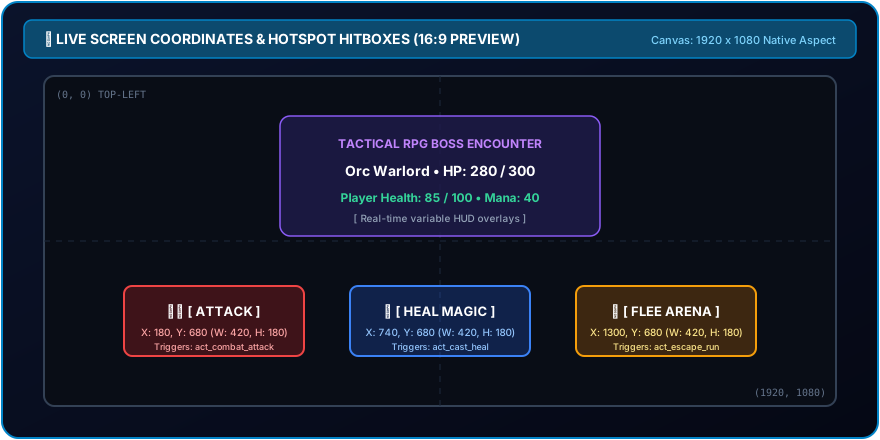
How Canvas Scaling & Hotspots Work
Interactive Screen canvases use percentage-based coordinates:
XandWidthare measured from0%(left edge) to100%(right edge).YandHeightare measured from0%(top edge) to100%(bottom edge).
Using Any Image File (No Restrictions!)
Do you need to use a specific image size or format? No!
- Use Any Image Size or Format: You can use any artwork file (
.png,.jpg,.jpeg,.webp) regardless of its dimensions or aspect ratio. - Hotspots Lock to Your Background: RagNext fits your backdrop image to the screen canvas container, and your hotspots stay locked to the artwork relative to where you placed them.
- Automatic Scaling: Whether your image is
800×600,1920×1080, or custom AI-generated artwork, RagNext handles scaling automatically so your hotspots always line up perfectly!
6.2 Step-by-Step: Enabling an Interactive Screen
Interactive screens can be attached to any Room or GameObject.
Step 1: Select a Room or Object
- Select a Room or Object in Studio (e.g.
Boss Battle Arena). - Click the Interactive Screen tab at the top of the main workspace.
Step 2: Configure Screen Settings
Check the settings at the top of the panel:
- Enable Interactive Mode: Check to turn on the screen overlay.
- Show Close Button (Top Right '✕'): Check if players should see an automatic
✕button to exit the screen. - Backdrop Asset ID: Select your background artwork image (e.g.
battle_arena.png). - On Close Linked Action: (Optional) Select a Global Function to run whenever this screen closes.
6.3 Creating & Styling Hotspot Buttons
Hotspots are the clickable region buttons placed on your screen backdrop.
Adding & Positioning Hotspots
- Click ➕ Add Hotspot under the Clickable Hotspots header.
- A new hotspot box appears on the 16:9 Live Preview canvas.
- Click and Drag: Click and drag the hotspot box anywhere on the canvas preview to position it visually.
- Auto-Select Sync: Clicking a hotspot box in the canvas preview automatically selects it in the hotspots list and opens its property inspector!

Hotspot Style Types
Choose how your hotspot button looks:
- Invisible: Creates a transparent hit region over buttons already drawn into your backdrop artwork.
- Text Label / Button: Dual-purpose text element:
- As a Text Button: Clickable button with attached action steps.
- As a Passive Text Label / HUD Placeholder: Use template tags (e.g.
{variables.PlayerHP} / {variables.MaxHP}orGold: {variables.Gold}) to render dynamic HUD displays, health meters, or status labels on your screen canvas without needing action steps!
- ImageButton: Displays a sprite thumbnail image asset.
- CustomBorder: Renders a highlighted frame over interactive props.
Micro-Animations: Hover Scale Grow Effect
Check Enable Hover Scale Grow Effect. In RagNextPlayer, hovering over the button smoothly enlarges it by 1.08x, giving your game a sleek, modern feel!
6.4 Authoring Inline Hotspot Action Logic
Every hotspot has self-contained action steps:
- Select a hotspot in your hotspots list.
- Click the prominent
🎨 Edit Hotspot Action Stepsbutton. - Studio opens the Visual Action Graph for that specific hotspot.
- Add any sequence of action steps:
Modify Integer: MonsterHP -= 15Play Sound: sword_slash.wavPrint Message: "You attack the monster!"Show Item Interactive Screen: Launch a sub-menu!
6.5 Nested Interactive Screens & Stack Navigation
RagNext supports infinite screen nesting using an automatic Navigation Stack (Push and Pop screen mechanics).
Example: Combat Engine with Backpack Sub-Menu
sequenceDiagram
    participant P as Player
    participant R as Room View
    participant S1 as Combat Screen (Main)
    participant S2 as Backpack Screen (Sub-Menu)

    P->>R: Enters Boss Room
    R->>S1: Push Combat Screen onto Stack
    P->>S1: Clicks "ITEMS" Hotspot
    S1->>S2: Push Backpack Screen onto Stack (Nested)
    P->>S2: Clicks "Close" (✕)
    S2->>S1: Pop Stack -> Returns smoothly to Combat Screen
    P->>S1: Clicks "FLEE" Hotspot
    S1->>R: Pop Stack -> Returns to Room View
How Screen Nesting Works
- When a hotspot action step executes
Show Item Interactive Screen, RagNext pushes the new screen on top of the navigation stack. - Clicking the top-right
✕close button (or executing aClose Screencommand) pops the top screen off the stack, instantly restoring the underlying screen underneath! - You can nest screens as deeply as you want (e.g., Main Screen $\rightarrow$ Inventory $\rightarrow$ Item Details $\rightarrow$ Spellbook).
6.6 Focus Canvas Mode (⤢) & Resizable Splitters
Studio includes power tools for designing interactive screens:
- Focus Canvas Mode (
⤢): Click the purple⤢button in the screen header to hide all left navigation rails, expanding your canvas preview across 95%+ of your monitor window. - Resizable Panel Splitter (
GridSplitter): Click and drag the vertical splitter bar between the Hotspot Inspector and Canvas Preview to adjust inspector width to any size you like.