Chapter 2: World Building — Rooms, Exits & Environmental Atmosphere
Rooms are the foundational building blocks of your game world. Whether you are building an expansive castle, a spooky mansion, a futuristic space station, or a small cozy study, every location the player visits is a Room.
In this chapter, you will learn how to create rooms, craft evocative descriptions, link rooms together with compass exits, set up locked doors, assign background artwork, and add atmospheric ambient weather effects.
2.1 Understanding Rooms in RagNext
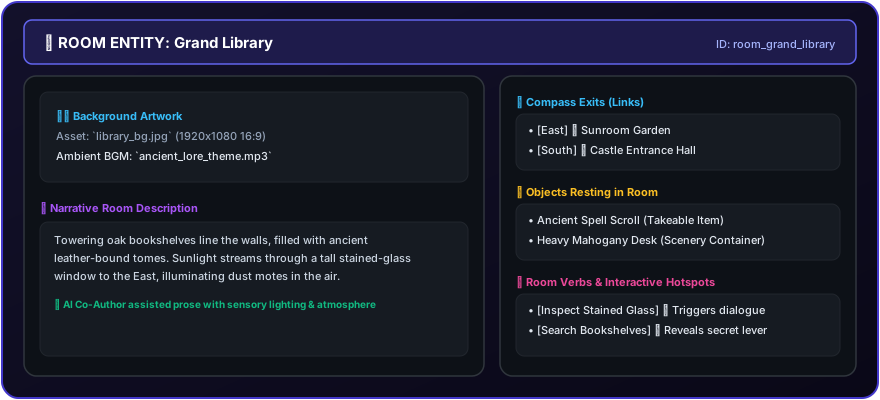
In RagNext, a Room is more than just a text description. A Room acts as a container for:
- Room Identity & Description: The title and story text shown to players when they arrive.
- Background Artwork & Audio: Visual artwork images and ambient soundscapes.
- Compass Exits: Links to neighboring rooms (North, South, East, West, etc.).
- Room Objects: Items, furniture, and props resting in the room.
- Room Verbs & Actions: Interactive story choices available to the player ("Examine Bookcase", "Pull Lever").
- Interactive Screen Overlays: Optional visual GUI panels with clickable hotspots.
2.2 Step-by-Step: Creating Your First Room
Let's walk through creating a room in RagNext Studio:
Step 1: Open the Rooms Workspace
- In the top view rail or left sidebar, click 📁 Rooms.
- The Left Sidebar will display your list of existing rooms.
Step 2: Add a New Room
- Click the ➕ Add Room button at the bottom of the room list.
- A new room entry appears in the list (e.g.
New Room).
Step 3: Configure Room Properties
Select the room in the list to reveal its properties in the main workspace:
- Room Name: Type a memorable title (e.g.
Overgrown Courtyard). - Description: Type your story description in the text box.
Pro Tip: Use sensory details—describe the sights, sounds, smells, and atmosphere to draw your player into the story!
2.3 Linking Rooms with Compass Exits
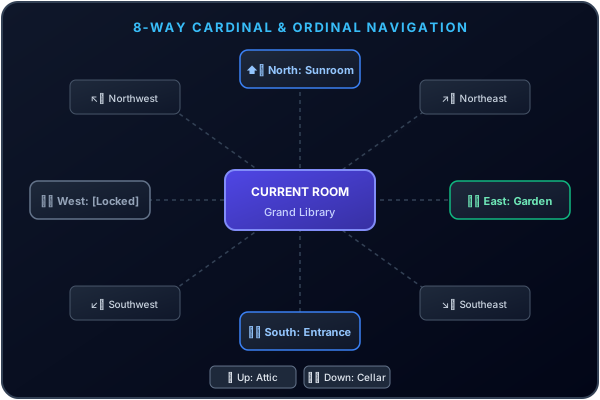
To let players travel between rooms, you link them using compass directions: North (N), South (S), East (E), West (W), Northeast (NE), Northwest (NW), Southeast (SE), Southwest (SW), Up, Down, In, and Out.
Step-by-Step: Connecting Room A to Room B
- Select Room A (e.g.
Courtyard). - Scroll down to the Exits section in the Room Inspector.
- Find the direction you want to link (e.g. North).
- Click the dropdown menu and select Room B (e.g.
Great Hall). - Check Two-Way Exit (Recommended).
What Two-Way Exit does: Checking this automatically sets Room B's South exit back to Room A, saving you from having to link the return path manually!
2.4 How Locked Exits Work in Gameplay
Creating locked exits is a great way to build puzzles, block dangerous areas, and guide player progression.
How Locked Exits Behave in RagNextPlayer
In RagNextPlayer, locked exits are hidden from the active movement menu:
- While an exit is Locked (
LockedExits = True), it will not appear as a clickable direction option in the player's movement list. This keeps hidden doors, secret passages, and locked gates hidden until unlocked. - As a storyteller, you can describe the obstacle in your room text (e.g. "To the North, a heavy iron door stands locked tight.").
- When the player unlocks the exit (by acquiring the required key item or solving a puzzle using an Unlock Exit action step), the direction instantly reveals itself as a valid, clickable movement option (e.g.
North: Great Hall)!
How to Lock an Exit in Studio
- In your room's Exits inspector panel, select the destination room for your exit (e.g. North $\rightarrow$
Great Hall). - Check the Locked checkbox next to that exit direction.
- (Optional) Select a Locking Key Item (e.g.
IronKey).- If a Key Item is assigned, picking up
IronKeyin the player's inventory automatically unlocks the exit! - If no Key Item is assigned, you can unlock the exit dynamically using an Unlock Exit action node in your Visual Action Graph (see Chapter 5).
- If a Key Item is assigned, picking up
2.5 Room Background Artwork & Media Assets
Visual artwork elevates your text story into a graphic adventure.
Adding Background Artwork to a Room
- Make sure you have imported your artwork into Media Assets (see Chapter 8).
- Select your room in Studio.
- In the Background Picture dropdown, select your image asset (e.g.
courtyard_art.png). - RagNextPlayer will automatically render the artwork image above the room description during gameplay!
2.6 Adding Atmospheric Weather & Screen Effects
RagNext Studio includes built-in atmospheric overlay particle effects and screen shake settings:
Atmospheric Overlays (AmbientOverlay)
Select an ambient weather or atmospheric overlay from the room inspector:
- Rain: Adds falling rain particle animations over the room image.
- Snow: Adds gentle falling snow particle effects.
- Fog / Mist: Adds drifting fog layers for creepy dungeons or graveyards.
- Ember Particles: Adds floating fire embers for volcano or tavern fireplace scenes.
- Particle Intensity: Drag the slider (
0.1to3.0) to control how heavy the weather effect appears!
Screen Shake Effects (ScreenEffect)
You can set a subtle environmental shake effect:
- Subtle Rumble: Great for crumbling ruins or engine rooms.
- Heavy Earthquake: Used for collapsing caves or boss encounters.
Chapter 2 Hands-On Exercise
Create a 3-room mini-map in Studio:
- Room 1:
Overgrown Courtyard(Rain weather overlay enabled). - Room 2:
Entrance Hall(Connected North from Courtyard). - Room 3:
Locked Treasury(Connected East from Entrance Hall, locked withGoldKey). - Link
CourtyardNorth toEntrance Hallas a two-way exit.