Chapter 1: Welcome to RagNext — Getting Started & Workspace Tour
Welcome to RagNext Studio! If you are a writer, narrative designer, illustrator, or creative storyteller, RagNext was created specifically for you. You do not need to be a C# programmer or software engineer to create rich interactive adventure games, mystery visual novels, point-and-click puzzles, or full RPG battle engines.
This chapter will guide you through setting up RagNext Studio, exploring the creator interface, understanding how game worlds are organized, and saving your very first project.
1.1 The RagNext Creative Philosophy
Historically, making interactive story games required learning complex code, managing file pathways, or fighting with technical game engine scripts. RagNext changes that by splitting game creation into clear visual concepts:
- Rooms are your story's stages (a dark dungeon, a cozy tavern, a spaceship cockpit).
- Objects are your props and items (a rusty key, a locked chest, a magic potion).
- Characters are your actors and NPCs (a friendly merchant, an ancient wizard, a guard).
- Variables are your story's memory notebook (tracking score, health, quest progress, or choices made).
- Actions & Visual Graphs are your story's event triggers (what happens when a player inspects an item, opens a door, or casts a spell).
- Interactive Screens are your visual GUI overlays (keypads, inventory screens, combat HUDs).
1.2 Installation & Launching Studio
RagNext Studio is a lightweight desktop application that runs on Windows, macOS, and Linux.
Launching on Windows
- Download or extract the
RagNext-Studiofolder to your computer. - Double-click
RagNext.exeto launch Studio.
Launching on macOS & Linux
- Open your terminal or finder and navigate to the extracted folder.
- Launch
RagNext(on macOS, you can double-clickRagNext.app).
No External Code Editors Required: You do not need Visual Studio, VS Code, or Unity installed to build and publish games with RagNext Studio. Everything you need is built right into Studio.
1.3 Guided Tour of the Studio Interface
When you launch RagNext Studio, you will see a clean, dark-themed workspace. The interface is organized into five primary sections:
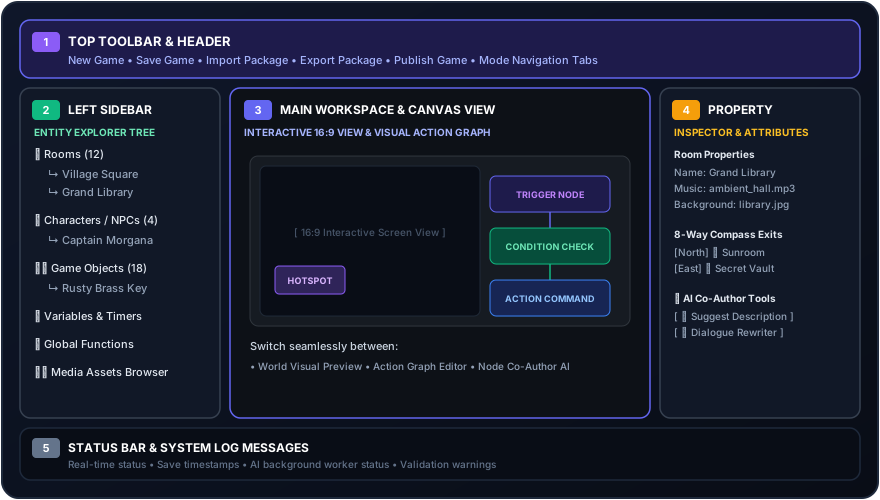
1. Top Toolbar & Header
Located at the very top of your screen:
- Project Controls: Quick access to New Game, Save Game, Import Package, Export Package, and Publish.
- View Navigation: Switch between Rooms View, Objects View, Characters View, Variables & Timers View, Functions View, and Media Assets View.
2. Left Sidebar (Entity Tree)
The left sidebar displays your game world directory hierarchy:
- 📁 Rooms: Contains all rooms and geographical locations in your game.
- 🎒 Objects: Contains all items, props, equipment, and containers.
- 👤 Characters: Contains all non-player characters (NPCs) and companions.
- ⚙️ Variables & Timers: Tracks global numbers, text flags, and real-time clocks.
- 🧩 Global Functions: Reusable background action sequences.
- 🖼️ Media Assets: Imported audio files and image artwork.
3. Main Workspace / Canvas View
The largest center area changes based on what you are currently authoring:
- Properties Editor: Type room descriptions, set background pictures, or configure object settings.
- Interactive Screen Preview: Visually position hotspot buttons on a 16:9 aspect ratio background image.
- Visual Action Graph Canvas: Drag and connect logic nodes to build puzzles, dialogues, and events.
4. Property Inspector (Right Sidebar)
Presents detailed properties for whichever item, hotspot, or action node is currently selected.
5. Layout Controls & Focus Canvas Mode (⤢)
When working on visual screens or complex graphs, screen real estate is valuable! Studio provides toolbar controls to customize your layout:
◀ Hide/▶ Sidebar: Toggles the main navigation rail on or off.📁 Rooms List/📁 Objects List: Collapses or expands the entity tree panel.⤢ Focus Canvas Mode: Hides all sidebars instantly, expanding the live preview canvas across 95%+ of your window.- Draggable Panel Splitters (
GridSplitter): Click and drag the vertical bar between the Hotspot Inspector and Canvas Preview to adjust panel widths to your liking.
1.4 Creating, Saving & Packaging Your First Project
Let's walk step-by-step through creating your first project!
Step 1: Create a New Project
- In the Top Toolbar or Welcome Window, click ➕ New Game.
- A prompt will appear asking for project details:
- Game Title: Give your game a name (e.g. My First Mystery).
- Author Name: Enter your name or studio name.
- Version: Set to
1.0.0.
- Click Create Game. Studio initializes a clean game world containing a starting room.
Step 2: Automatic Real-Time Auto-Save
RagNext Studio features Continuous Automatic Auto-Save:
- You never have to worry about losing progress or manually clicking a save button!
- Every room description you type, item you place, variable you modify, and hotspot you position is automatically saved to your project workspace in real time as you work.
Step 3: Exporting Project Packages (.ragpkg)
If you want to back up your project, move it to another computer, or share it with a co-creator:
- Click 📦 Export Package in the top toolbar.
- Choose a destination folder and filename (e.g.
MyFirstMystery.ragpkg). - Click Save. Studio bundles all your rooms, objects, action graphs, variables, and imported media assets into a single compressed
.ragpkgpackage file.
Importing Packages: To open a
.ragpkgfile on another computer, launch RagNext Studio and click 📥 Import Package. Select the file, and Studio unpacks the complete project automatically!
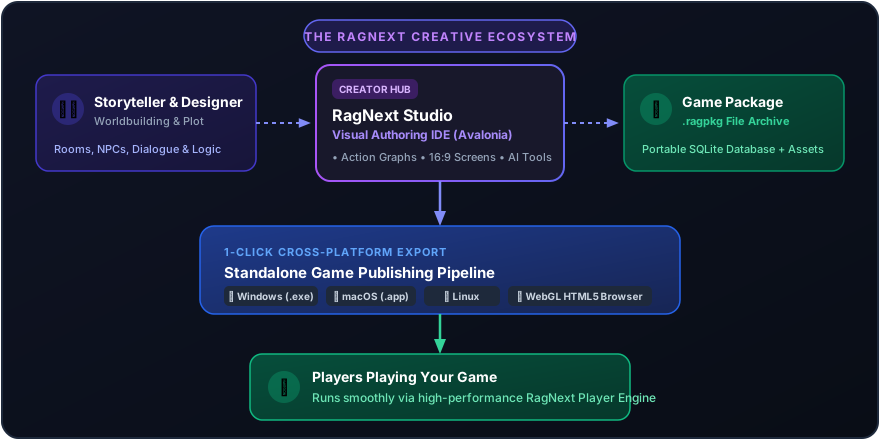
1.5 How Publishing Works (Creating Standalone Games for Players)
When your game is finished and ready for players to play, you don't send them a designer file. Instead, you Publish a standalone, branded game package!
RagNext Studio includes a built-in Publish Engine (PublishEngine):
- Click 🚀 Publish in the top toolbar.
- Select your Target Platform:
- Windows: Produces a standalone
.exegame folder or.zipfile. - macOS: Produces a native
.appapplication bundle. - Linux: Produces an executable Linux binary package.
- WebGL: Produces an HTML5 web package that plays in web browsers (perfect for hosting on
ragnext.comor itch.io!).
- Windows: Produces a standalone
- Set your output destination folder and click Publish Game.
- Studio takes the precompiled RagNext Player runtime, injects your game world data and media assets, and generates a ready-to-play standalone game for your audience!
Chapter 1 Checklist & Hands-On Exercise
Before moving to Chapter 2, practice the following in RagNext Studio:
- Launch RagNext Studio.
- Create a new project titled "Test Adventure".
- Practice toggling the left sidebar on and off using
◀ Hide. - Practice entering and exiting
⤢ Focus Canvas Mode. - Verify that your edits auto-save automatically in real-time.
- Export a backup copy using 📦 Export Package.